1. After
transcoding the picture clips, import them into your Final Cut project.
Make sure all audio files are 48kHz AIFF files and import them into the
project.
2. Make sure "audio scrubbing" is on (toggles on and off with "Shift S.") Put the cursor
on
the exact audio frame where the hand clap for the take closes (use the
right and left arrows to navigate to the exact frame). Refer to the
audio meters on the lower right to make sure you have the correct frame.
Single click on the clip in the timeline to highlight it. Use the "m"
key to place a marker on that frame.
3. Drag
the first picture clip to be put into sync from the browser to the
timeline. Put the cursor on the exact frame where the hand clap closes.
Click on the clip in the timeline to highlight it. Use the "m" key to
place a marker on that frame.
4. Line
up the markers you have placed on the picture and sound clips. Expand
the timeline view (command plus) to make sure that the two markers are
actually lined up, then reduce the timeline view (command minus) Using
the razor tool (command b), cut the sound clip to the exact length of
the picture clip. The "snap to" function (toggles on and off with
lower-case n) will make it easier to line up the cursor (the CTI) with
the beginning and end points of the picture clip so you can cut the
sound clip in the correct place. Highlight both the picture and sound
clips. Link the clips by hitting "Command L," or Modify>Link. The
clips are now in sync.
5.
When you're syncing double-system material that has a single-system
scratch track (for example, when shooting with a DSLR), you don't really
need a slate, though it can make syncing faster. Just expand the
vertical height of the track to make the waveform more visible and line
up the waveform of the double-system track with the waveform of the
single-system scratch track. Play the track. If it sounds "reverb-y,"
it's not quite in sync. Use the open or close bracket on the keyboard to
nudge the double-system track right or left one frame until it's in
sync. Be sure to remove the scratch track from the timeline before
linking the picture and audio clips.
Thursday, December 11, 2014
Tuesday, December 9, 2014
BLOG POST 4- Due Dec. 18
Sound-Image and Image-image Relationships
For this assignment, you will take a scene or sequence of an edited film (fiction, experimental or documentary), and examine the way it is constructed. Pick an example where you think the editing has made a significant contribution to the storytelling and the feel of the piece. What is the relationship of the sounds to the images? Of the images to one another? How are the shots organized in terms of their content, composition, color, movement, etc.? What determines how long the shots are and what order they are placed in? It there a “right” place to cut or not to cut? Are the cuts seamless or obvious? Is the rhythm smooth or balky?
Once you have a sense of what is happening with the editing of the sequence, explain how this approach connects with and supports the overall goals of the film and its makers.
You should choose a short piece of media (2-3 minutes max) you can watch several times. The scene you pick should be available online so that your section leader can look at it as well. Please provide a link in your blog to the media.
250 Words
Due Dec. 18 at noon- FIRM
Thursday, December 4, 2014
Take 2: Transcoding for High Def
- TRANSCODE .MTS FILES INTO A .MOV FILE WITH ADOBE MEDIA ENCODER AND MPEG Streamclip
[High Definition Workflow]
- Open the program Media Encoder in the Applications folder.
- In Media Encoder, go to Preferences. In the General section, look under Output. Click on the “browse” button next to “specify output file destination” and select the folder that you just made in your External Hard Drive called MOV.
- From the MTS folder, drag the .MTS files and drop them into the Queue in Adobe Media Encoder. The Queue is the large window on the left.
- Uncheck the little box titled: “Auto encode watch folders” at the top.
- Click on the Triangle button under Format to pull up the drop down menu of formats. Choose Quicktime.
- Click on the Triangle Button under Preset to pull up the drop down menu of presets -----> If you shot 30fps, choose:

------> If you shot 24fps, choose:

- Press the green play button to begin converting.
- Now each .mts file should become an .mov file with the same name, in the folder called “MOV”. Close Adobe Media Encoder.
- In your VIDEO Folder (in your external drive) create a new folder and call it “PRO-RES”.
- Open the program MPEG Streamclip in the Applications folder.
- In MPEG Streamclip, go to List > Batch List:
- Go to Add Files and select your .mov files in your MOV folder. Then click To Batch.
- A window will open. Select OK:

- In the new window, select the folder that you just made in your External Hard Drive called “PRO RES”.
- Now, at the top of the window, in the Compression category, choose the Apple Pro Res setting from the pop-up menu:
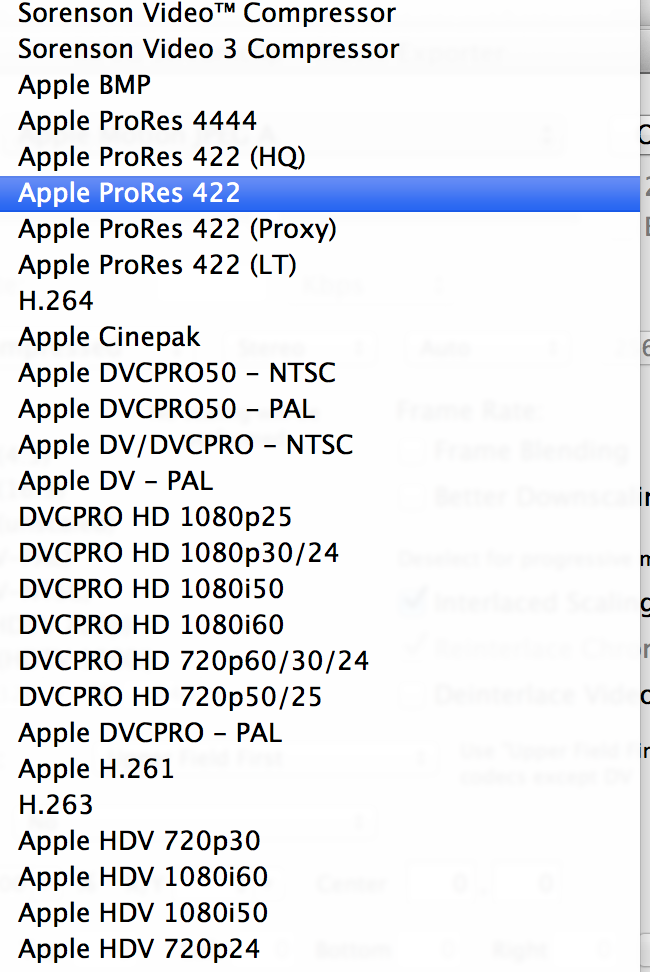
- And set everything like this:

Note: At Frame Rate, type 29.97 if you shot 30fps; 23.98 if you shot 24fps.
After The batch, your files (In the “PRO RES” folder) are ready to be imported into Final Cut Express.
Saturday, November 29, 2014
Transcoding: .mts to .mov
How to use Adobe Media Encoder to convert .mts files into Quicktime movies that Final Cut Pro can edit:
- Launch Adobe Media Encoder.
- Drag and drop your .mts video files into the Queue window.
- Click on the Triangle button under Format to pull up the drop down menu of formats.
- Choose Quicktime.
- Click on the Triangle Button under Preset to pull up the drop down menu of presets.
- Choose HD 720p 24, H.264, AAC, 48kHz.
- Once all files have been imported and you have applied all the settings click on the Green play button. This will start converting all the files in the Queue.
Wednesday, November 26, 2014
LAST extra credit opportunity & upcoming weeks
for extra credit:
1.
Visit the exhibition: Becoming Robot at the Asia Society and Museum
725 Park Avenue (at 70th Street)
Hours: Tuesday-Sunday, 11:00 am-6:00 pm; open until 9:00 pm on Fridays.
Admission: $7.00 for students with ID
Admission is free on Fridays from 6:00 pm to 9:00 pm.
2.
Blog at least 350 words about Paik's work general and what you learned from the exhibition. You should also include your thoughts about Paik's work in relation to technology and culture. This blog post is due on December 15 at midnight (this date is FIRM) to receive extra credit.
---
As the end of the semester approaches, here is the schedule of what we will be working on in the upcoming weeks:
Lab 12- Dec 4: Edit Continuity Project
Please bring all your material ready to edit. That means having all your music, audio files, video files, additional graphics or text ORGANIZED in your hard drives, and ready to start a new Final Cut project. We will not have time to troubleshoot moving files around or trans-coding, so please do all that before Lab.
Lab 13- Dec. 11: Finish editing and uploading project
You should come to this lab ready to put the final touches on your project and review it with your group before you export. We will only be using 1 hour of Lab to finish editing. If you need more time, you will need to edit outside of class time between Dec. 4 and Dec. 11
Blog 4: "Sound and Image relationship" is due by December 13 at midnight.
Tuesday, November 18, 2014
Sony Alpha 3000 Basics
SONY Alpha 3000 Manual
FILMP/MEDP 150/160 • M. Lucas
The Sony Alpha 3000 looks like a DSLR, but it actually is closer to a video camera in an SLR body, AKA a “mirrorless” camera. It records a 20MB still image (5456 x 3632 pixels!) and can be set for JPEG or RAW + JPEG.
The camera comes with a battery, a charger, a lens cap, a lens hood and a shoulder strap. The lens has a UV filter, which can be cleaned without damaging the lens. There are two kinds of chargers, one where you plug in the camera, and the other where you just put the battery in the charger, a better idea. The batteries should last through more than one day of shooting. But they should be charged at least once a week.
The camera stores images on an SD card, which is in a slot as shown. Be careful with the door covering the card. The card removes by pushing it in, and springing it out.
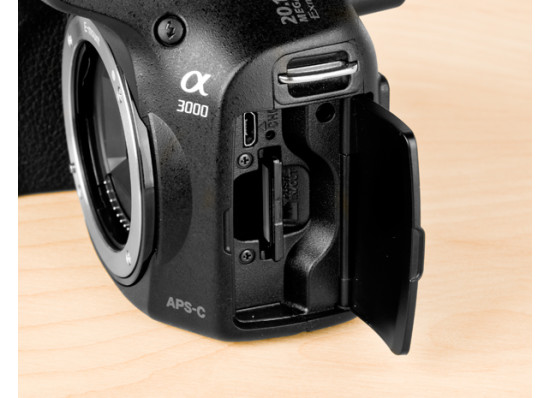
Side door for SD card and charger.
Using the Camera
The viewfinder is electronic, giving you the same image you see on the back viewscreen. There is a button on the top right to switch between the two ways of viewing next to the Mode Wheel. (see below) The viewfinder is good for situations that are too bright for the rear screen, but not great for critical viewing.
The lens is interchangeable. It is an E-mount lens, which is a new Sony mount. So adaptors are needed for other lenses like Canon or Nikon.
The lens feels like it should be a manual focus lens, but it is not. (The ‘focus’ ring seems to be a dummy.) The only manual adjustment is for focal length, from 18-55mm. It is also not a fast lens, maxing out at f3.5 on the wide, and f5.6 on the telephoto end.
While there is no manual focus, there are easy adjustments with the control wheel for both f-stop, and for shutter speed.
The sensor is a standard APS-C 23mm sensor, similar to that on a Canon 7D. This means the camera can give a 'film look' depth of field under the right circumstances.

Shooting and Controlling Exposure
Setting focus. There is no real manual focus control with the standard lens. To focus, you need to hold the shutter button part-way down, and the camera will focus based on a grid (you'll see little green markers). If you let go of the button, the camera will keep that focus.
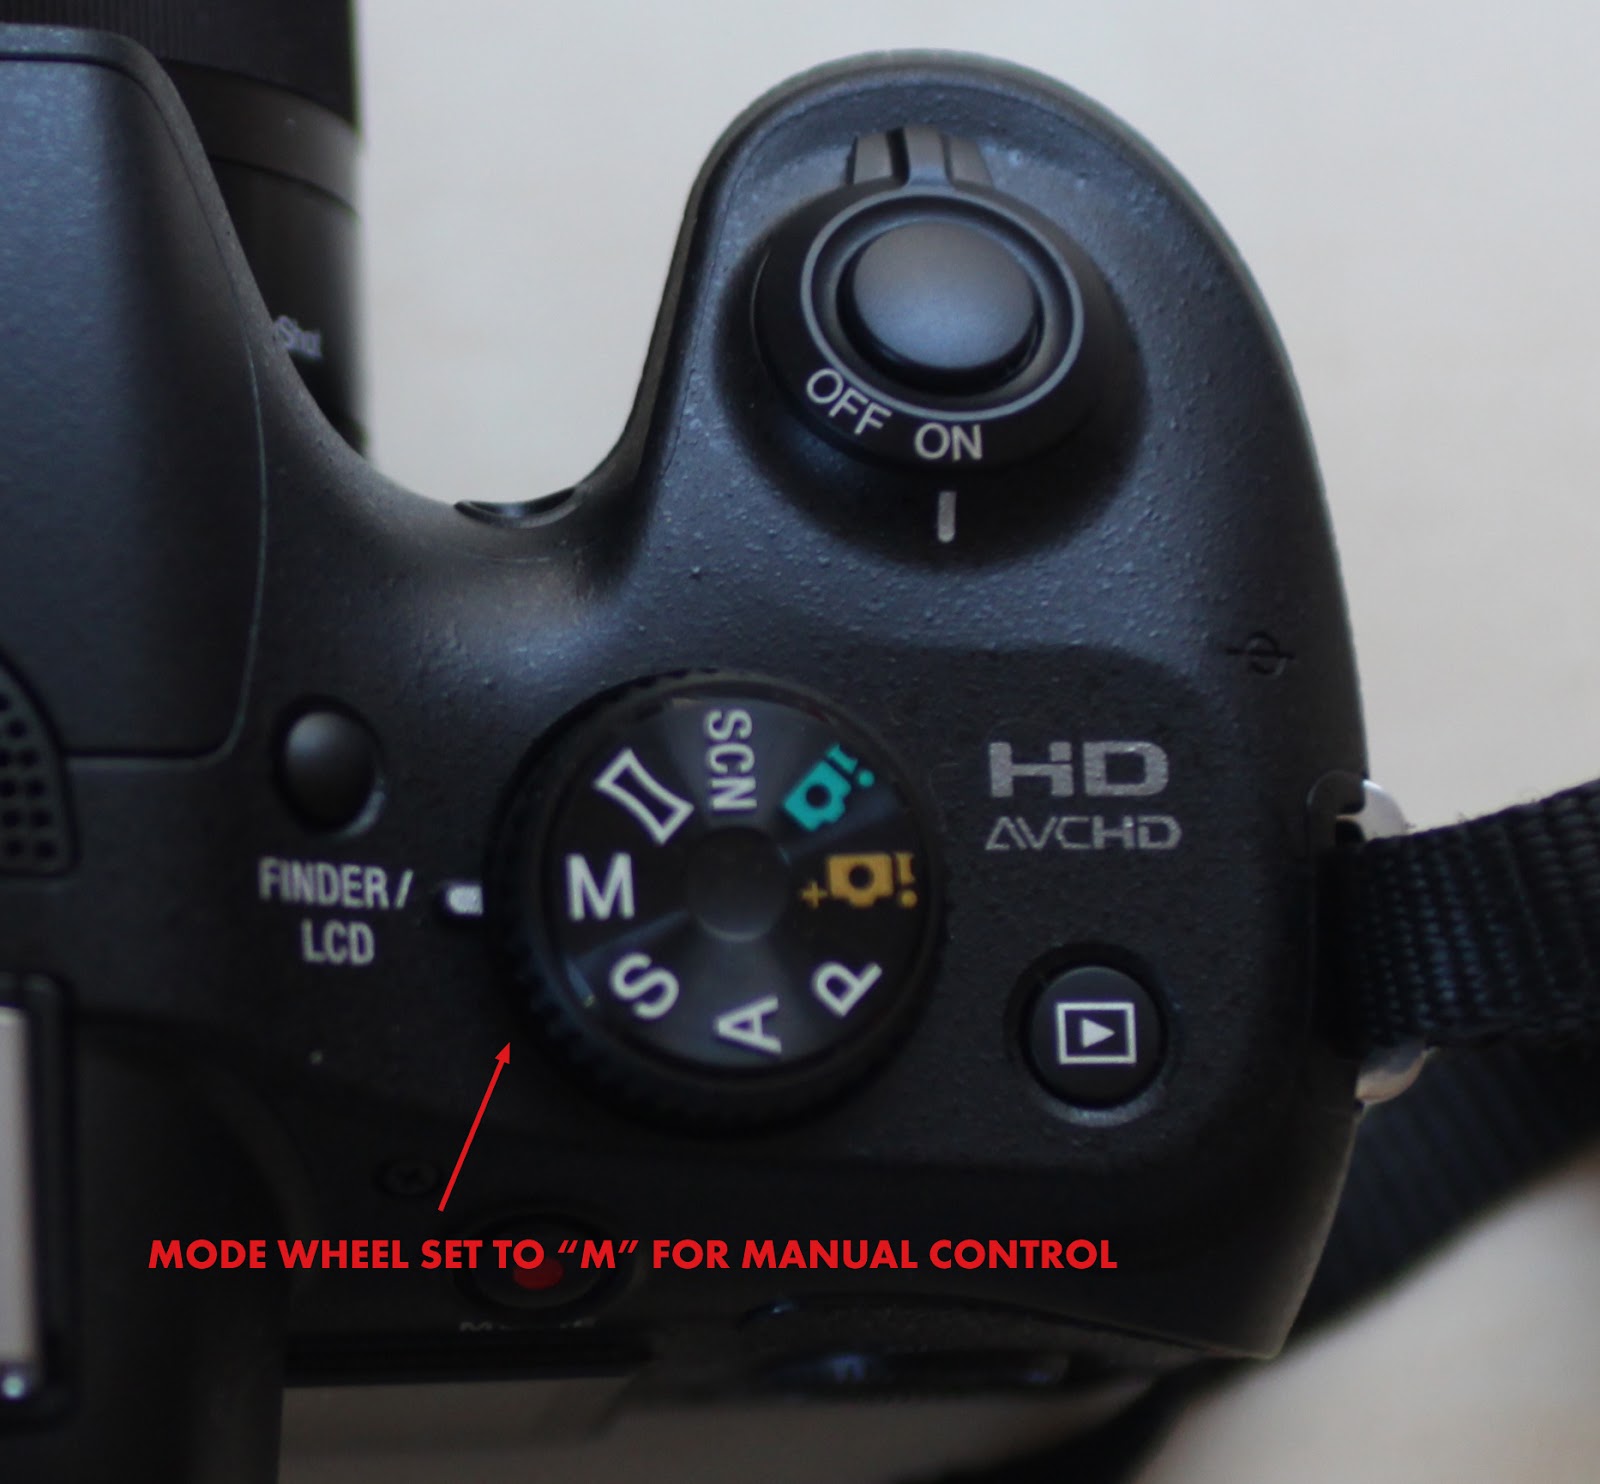
Setting the camera to Manual (M on the dial on the top right) allows you to control both aperture (f stop) and shutter speed. Both are controlled by first clicking the control wheel on the bottom edge and then spinning it. Pushing the wheel toggles the two controls, showing you the one you have control over in yellow.
You also have control over the ISO, the measure of the camera's sensitivity to light, clicking the control dial on the right side, and then spinning the dial.
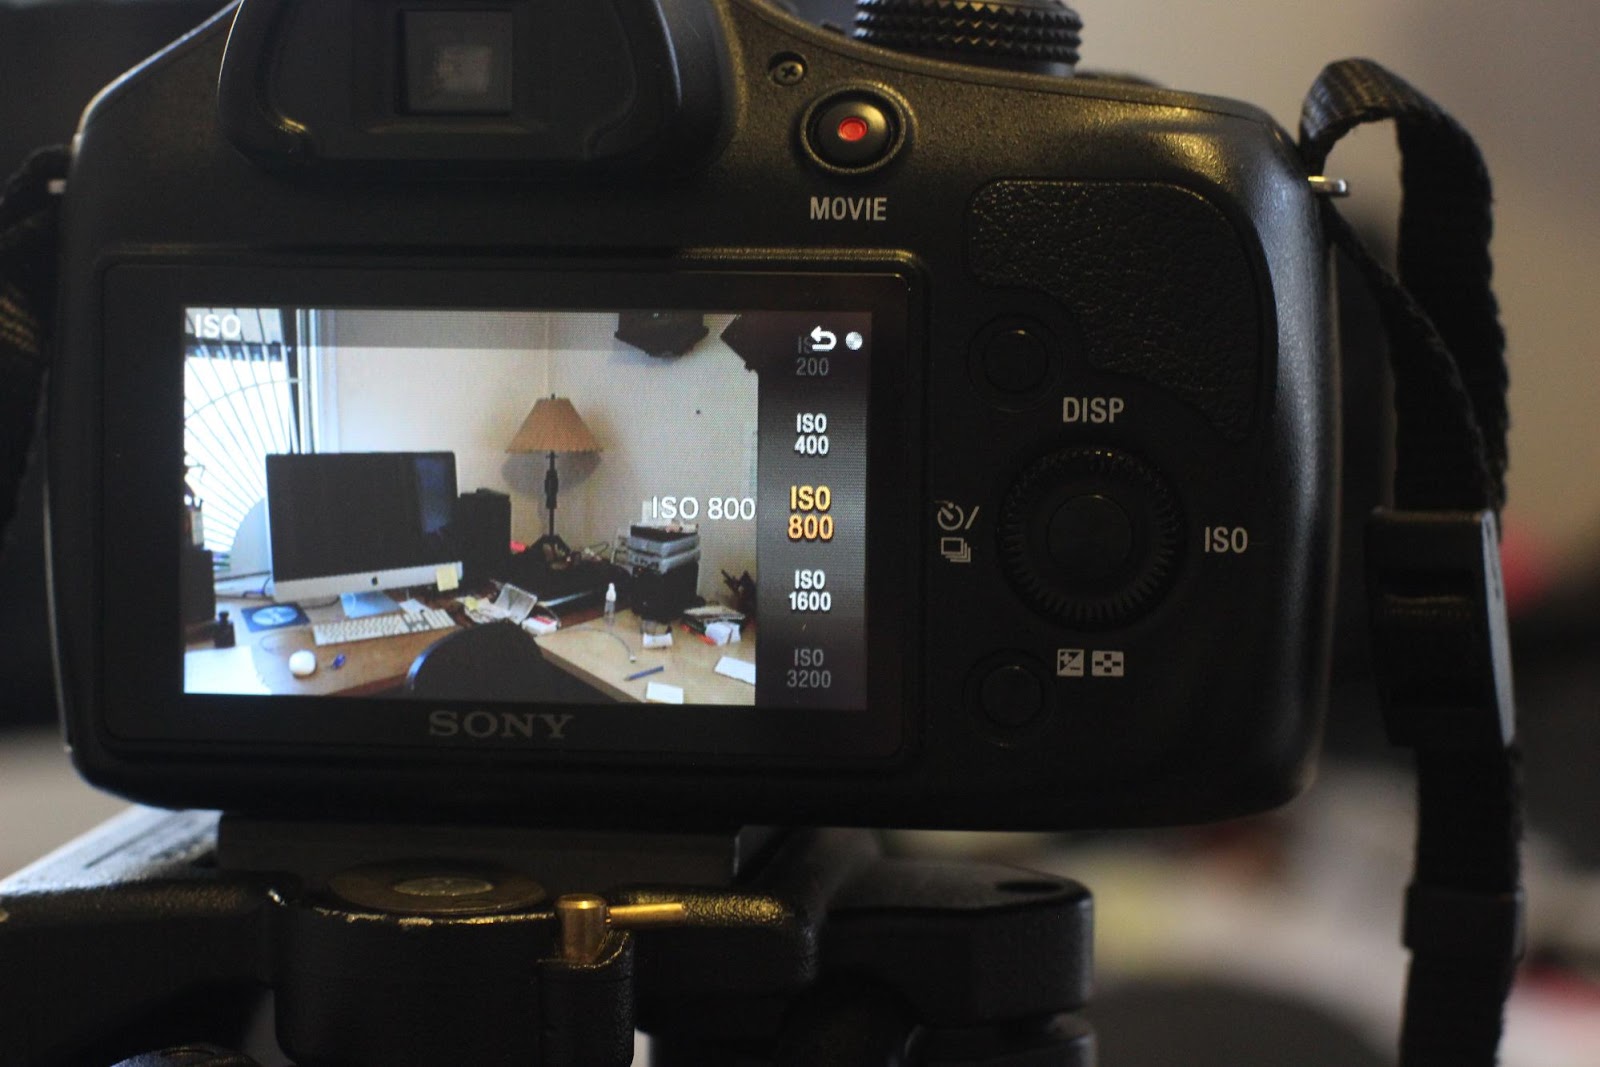
A good place to start is to set the ASA fairly low. This could be ISO 100 outdoors, and ISO 400 or 800 indoors. Then set the shutter speed to 1/60th, which is standard. After that, you can play with the f stop, going from f5.6 to f8, to f11, and f16.
In practice, it may be necessary to vary the shutter speed a lot, going as high as 1/250 of a second when working outdoors.
The camera has a “steady shot” compensation for camera shake, which should probably be left in place for video recording.
MOVIE RECORD
The movie button acts pretty independently of the other controls. You can use the shutter button for focus, and then hit the movie button. It records AVCHD .mov files in full HD 1920 x1080 format. These need to be transcoded to work with Final Cut Express. The audio is for reference only, and is recorded at 48kHz. There is no mic input. For consistency I recommend that we use the 60i (17M) setting “FH”. See “Image Size” in the menu.
Thursday, November 13, 2014
Subscribe to:
Posts (Atom)